Recover data from flash drive r studio. How to use R-Studio (Data recovery)
Hello.
Today, every computer user has a flash drive, and more than one. Many people carry information on flash drives that costs much more than the flash drive itself, and they don’t make backup copies (naively believing that if the flash drive is not dropped, flooded or hit, then everything will be fine with it)…
I thought so too, until one fine day Windows OS was unable to detect the flash drive, showing the RAW file system and offering to format it. I partially restored the data, and now I’m trying to duplicate important information...
What to do before restoration and what not to do?
1. If you find that there are no files on the flash drive - then don’t copy or delete anything from it at all! Just remove it from the USB port and don't work with it anymore. The good thing is that the flash drive is at least detected by Windows OS, that the OS sees the file system, etc. - which means the chances of recovering information are quite high.
2. If Windows OS shows that the file system is RAW and prompts you to format the flash drive- do not agree, remove the flash drive from the USB port and do not work with it until you restore the files.
5. If the flash drive is not detected by computers and they don’t see it at all, but you really need the information, contact the service center, I think you won’t be able to do it on your own...
6. And lastly... To recover data from a flash drive, we need one of the special programs. I recommend choosing R-Studio (we’ll talk about it later in the article). By the way, not so long ago there was an article on the blog about programs for data recovery (there are also links to official sites for all programs):
Recovering data from a flash drive in the R-STUDIO program (step by step)
Before you start When working with the R-StUDIO program, I recommend closing all third-party programs that can work with a flash drive: antiviruses, various Trojan scanners, etc. It is also better to close programs that heavily load the processor, for example: video editors, games, torrents, etc.
1. Now insert the flash drive into the USB port and launch the R-STUDIO utility.
First you need to select the flash drive in the list of devices (see screenshot below, in my case it is the letter H). Then click on the “Scan” button
2. Should A window with flash drive scanning settings will appear. Several points are important here: firstly, we will scan completely, so it will start from 0, we do not change the size of the flash drive (my flash drive in the example is 3.73 GB).
By the way, the program supports quite a few file types: archives, images, tables, documents, multimedia, etc.
3. After this the scanning process will start. At this time, it is better not to interfere with the program, not to launch any third-party programs or utilities, and not to connect other devices to the USB ports.
Scanning, by the way, is very fast (compared to other utilities). For example, my 4 GB flash drive was completely scanned in about 4 minutes.
4. After completion scanning - select your flash drive in the list of devices (recognized files or additionally found files) - right-click on this item and select " Show disk contents«.
For example, select a photo or picture, right-click on it and select “preview”. If the file is needed, you can restore it: to do this, right-click on the file, just select “restore" ![]() .
.
6. Last step very important! Here you need to specify where to save the file. In principle, you can choose any disk or other flash drive - the only important thing is that you cannot select and save the recovered file to the same flash drive from which the recovery is taking place!
The point is that the recovered file can overwrite other files that have not yet been recovered, so you need to write it to another medium.
When working with a computer, everyone has had to deal with the accidental deletion of a necessary file, or suddenly you need a deliberately deleted file. How to restore it?
You need to remember one important circumstance: after deleting a file, you need to try not to make any changes on the partition of the hard drive/flash drive from which the file was deleted. All manipulations (downloading a program, restoring files) must be done with another partition (therefore, I always recommend having at least two partitions: Disk C and Disk D). We will need the R-Studio program. You can find it on the developer's website. Download and install. Opening:
We need to recover data from a flash drive (Disk G in this case). Left-click on it (the name becomes bold). Click on the button Scan , the result is displayed as follows:

We look for the required files in this list. In this case, the entire contents of the flash drive were needed. Just check the boxes next to the files/folders that need to be restored. Press the button Restore marked :

On the top line To folder indicate the path where to restore deleted files ( remember that you need to select a partition other than the one being restored). We put the necessary checkboxes (you don’t have to change anything; by default, everything you need is already checked) and click Yes .
We wait for the process to complete and check in the destination folder whether the necessary files have been restored. We launch them, thereby checking their performance.
As you can see, the process is quite simple.
What does data loss mean to a modern person? This is comparable to a catastrophe! After all, all important information is now stored digitally on various media, and losing it costs nothing. Accidentally deleting data, catching a malicious virus that will destroy important documents, unexpectedly crashing and damaging the file system, or carelessly pulling out a flash drive followed by the sentence “ Format?"and that's all...
There are no more family photos, favorite music and films, and it’s even worse when you lose documents related to work or study: coursework, diplomas, quarterly reports, etc. For such cases, data recovery programs have been written that can scan the media and help you get your data back. We will look at one of the best recovery programs today.
R-Studio is a software package from R-Tools Technology Inc. to recover data after deletion, formatting, or damage to the file system. It can work with most popular media: flash drives, memory cards, hard drives, CDs, DVDs and floppy disks, as well as with RAID arrays and even restore files remotely.
Compatible versions of the program have been developed for Linux, Mac and Windows operating systems, including in Russian. The distinctive features of R-Studio include:
- Creating and working with disk or partition images
- Reconstruction of RAID disk arrays
- Supports most popular file systems
- Data recovery over the network
- Built-in hex editor
R-Studio was originally developed for experienced users who have repeatedly encountered data recovery, for system administrators, and IT professionals. But don't be scared, because... the program is simple and understandable and it will be enough to study the instructions we have written and illustrated explaining.
You can download the full Russian version of R-Studio or the portable version. The antivirus may complain about viruses, but there are no malware in the files. Verified!
Instructions: how to use R-Studio
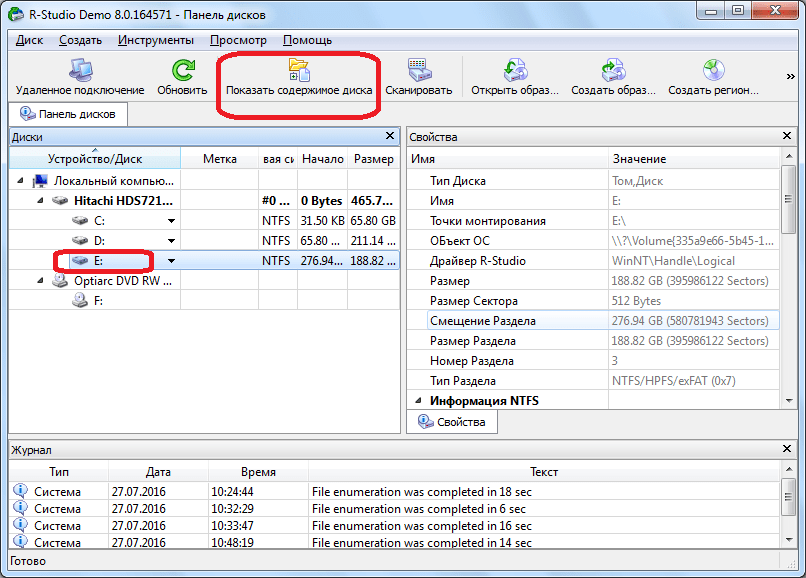
We start by launching the program and the main disk viewing window (disk panel). All disks and drives that are connected to the computer and complete information on them are displayed here: type, volume, file system, sector size, etc. Select the disk or device on which the files were located.
Image #1: Disk panel
The easiest and fastest way would be to go directly to scanning, but it is better to make a disk image and work with it so as not to unnecessarily expose data that could be further damaged or deleted permanently. The image will require a free amount of memory commensurate with the size of the data occupying the restored disk. In the program, click “Create image” and in the window that opens, select the path where the created image will be stored and click “Yes”.
Image #2: Creating the image
Image #3: Image creation process
The image creation process depends on the disk size and can take several hours, so be patient. After completion, we return to the main window, where we select “Open image” and specify the path.
Image #4: Opening the image
The image has appeared in the disk panel and now you can start scanning without fear that the real data on the disk will be damaged. Click “Scan” and in the window that opens, click “Advanced”. If we are only interested in certain types of files, then we go to “Known file types” and select those that we need, thereby significantly reducing the search time. Otherwise, check the “Search for known file types” checkbox to search for all files.
Image #5: Scan Settings
You need to select the type of scan. It depends on how much time you are willing to spend on restoration and how big the device is. In this case, it is a 1.8 GB memory card and you can set it to a “detailed view”, when a table of sectors and information about found objects will be clearly displayed. If you are restoring a hard drive or a large device, then it is better to choose the less colorful and visual, but fastest “No”.
Image #6: Visual scanning process
The scanning process has started, which can last from several minutes to several hours, depending on the amount of data, the selected file types and system performance.
After completion, the program will offer a list of files for recovery. The easiest way is to right-click and select “Recover all files”, or you can restore only those you need by checking them and clicking “Restore selected files”.
Image No. 7: "Restore all files"
In either case, you will be asked to select a location to save the data. After which the recovery process will begin, which can last several hours depending on the volume of data.
Image #8: Recovery options
Image #9: Data recovery process
Note that R-Studio is not the fastest program to use, but the quantity and quality of the data it recovers justifies this.
R-Studio is a package of applications for recovering deleted files. R-Studio is equally suitable for restoring local information sources (hard drives, flash drives, etc.) and remote machines. This program differs from many other programs for recovering files on HDD precisely in that you can recover files on computers over a network.
You can download the R-Studio program.
Supports many OS and platforms
The program is multi-platform: Windows 9x-Windows 10, server OS (2012 Server, etc.) are supported. Support for other operating systems, including Mac OS, Lunux, Unix.
Main features of R-Studio
The R-Studio resuscitator uses unique IntelligentScan technology. Many settings help you customize the recovery process, speed up the search for files, and at the same time increase the likelihood of finding deleted information. This is also facilitated by a recovery wizard and useful help in Russian.
Simple design and visibility of the restoration process
Traditional design in Explorer style. The program will be easy to navigate for novice users and convenient when performing file operations with recovered files.
Very often, recovery application developers make the process opaque. As a result, the user cannot control the recovery; everything is not obvious from beginning to end.
The R-Studio program, on the contrary, shows detected files, displays the file type, file system type and other information that will somehow help the user understand.
Remote recovery of information on hard drives. You can connect to the PC remotely and help with the problem. Moreover, you can restore files on another OS while being in Windows. The main thing is to gain access to the machine of the user who needs help.
Convenient saving of recovered information
Firstly, in R-Studio you can create a special list of recovered files for export. The user can also save the project file for later work with the files. There is no need to restart the process of recovering information from a disk or other file storage source. All settings and marks will be saved in the export file.
Wide list of supported file systems
- FAT12/16/32, NTFS, NTFS5 (for Windows and Mac OS recovery)
- exFAT, ReFS, Ext2/3/4FS (for Linux and other OS)
- HFS, HFS+, HFSX and UFS1, UFS2, UFS, etc.
Even if the file system type is not set (the so-called “raw format”), R-Studio allows you to detect a deleted partition or file table, correct raw formatting, and restore information.
Recovering compressed, encrypted disks, alternative NTFS streams.
Supports different file types and extensions
- recovery from hard drive, cd and dvd discs
- flash cards, USB drives, SD and microSD memory cards
If data has been deleted in a RAID array, you can recover some of the lost data in R-Studio. RAID6, RAID5 and RAID4 arrays are supported. In the settings, the user can manually specify the block size, save the configuration of dynamic disks for a given PC, etc. Also available is checking RAID integrity, block correctness, and reading RAID array parameters.
Creating a disk image for later recovery
As a professional product, R-Studio will be of interest to restoration specialists. A disk image (clone) is useful when working with problematic hard drives, if there are bad sectors or read errors, which makes the recovery of information significantly slower or completely impossible in the usual way.
- Byte-by-byte copies of hard drive partitions
- Password-protected compressed disk images.
In both cases, the image can be easily mounted to a local or remote computer, then analyzed and recovered files.
Other options
- Preview of saved files before recovery. Creating templates and editing files in a HEX editor.
- Ability to save information on a remote machine or local PC. Very convenient if you are working with someone else's PC and want to demonstrate the result. It is important that the user has available space (a separate disk) on the remote PC.
- The R-Studio Emergency kit allows you to use a boot disk for recovery when the operating system is not working (for example, if the boot record has been lost or the OS has stopped loading due to the deletion of system files).
Other recovery scenarios using R-Studio
In R-Studio it is possible to restore files:
- deleted from the Windows Recycle Bin. Often, users empty the Recycle Bin, deleting files permanently. R-Studio quickly recover files, the chances of this are high
- damaged by a virus or after a power failure. Partially saved, damaged files are recoverable in some cases
- after formatting your hard drive, SD card or flash drive. If formatting was in fast mode, there are no problems at all. With deep formatting, the chances are minimal, but there are still opportunities - “on fresh tracks”.
- Damage to the file table and disk structure. As already mentioned, raw partitions can be restored, saved in a regular file system, corrected markup and found all files in their entirety, since they have not yet been overwritten.
No user is immune from data loss from a computer or external storage device. This can happen in the event of a disk failure, a virus attack, a sudden power cut, or mistaken deletion of important data bypassing the trash can or from the trash bin. It’s not so bad if entertainment information is deleted, but if there was valuable data on the media? There are special utilities to recover lost information. One of the best ones is called R-Studio. Let's talk in more detail about how to use R-Studio.
The main function of the program is to recover lost data.
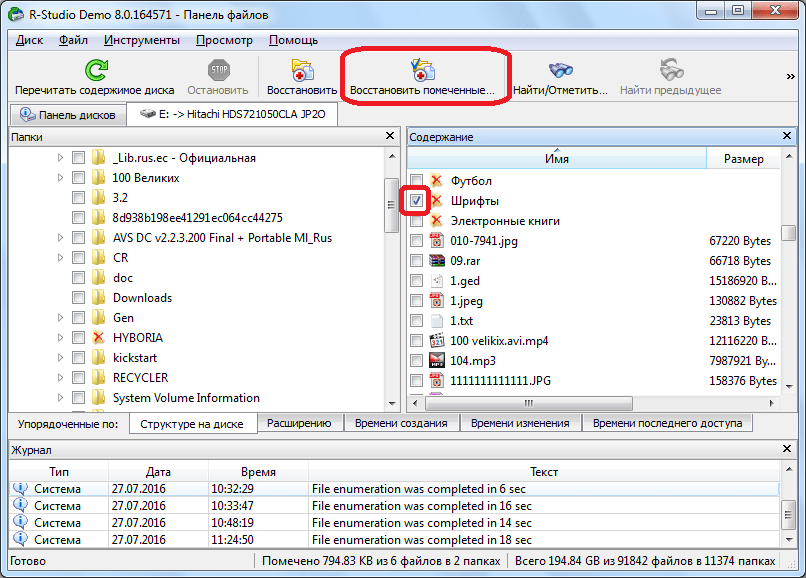
To find a deleted file, you can first view the contents of the disk partition where it was previously located. To do this, click on the name of the disk partition, and click on the button in the top panel “Show disk contents”.
The processing of information from the disk by the R-Studio program begins.

After the processing process has occurred, we can observe the files and folders located in this disk partition, including deleted ones. Deleted folders and files are marked with a red cross.
In order to restore the desired folder or file, mark it with a checkmark and click the button on the “Restore marked” toolbar.
After this, a window opens in which we must specify the recovery parameters. The most important thing is to indicate the directory where the folder or file will be restored. After we have selected the save directory and, if desired, made other settings, click on the “Yes” button.

After this, the file is restored to the directory that we specified earlier.
It should be noted that in the demo version of the program you can restore only one file at a time, and then no more than 256 KB in size. If the user has purchased a license, then group recovery of files and folders of unlimited size becomes available to him.
Recovery by signatures
If, while viewing the disk, you do not find the folder or file you need, this means that their structure has already been damaged due to new files being written over the deleted elements, or an emergency violation of the structure of the disk itself has occurred. In this case, simply viewing the contents of the disk will not help, and you need to conduct a full scan using signatures. To do this, select the disk partition we need and click on the “Scan” button.

After this, a window opens in which you can set scanning settings. Advanced users can make changes to them, but if you are not very knowledgeable about such things, then it is better not to touch anything here, since the developers have set the default optimal settings for most cases. Just click on the “Scan” button.

The scanning process starts. It takes a relatively long time, so you will have to wait.

After scanning is completed, go to the “Found by signatures” section.

Then, click on the inscription in the right window of the R-Studio program.

After a short processing of the data, a list of found files opens. They are grouped into separate folders by content type (archives, multimedia, graphics, etc.).

In files found by signatures, the structure of their location on the hard drive is not preserved, as was the case in the previous recovery method; names and timestamps are also lost. Therefore, to find the element we need, we will have to look through the contents of all files of the same extension until we find the required one. To do this, simply right-click on the file, as in a regular file manager. After this, the viewer for this file type, installed on the system by default, will open.
We restore data as before: mark the desired file or folder with a checkmark, and click on the “Restore marked” button in the toolbar.

Editing disk data
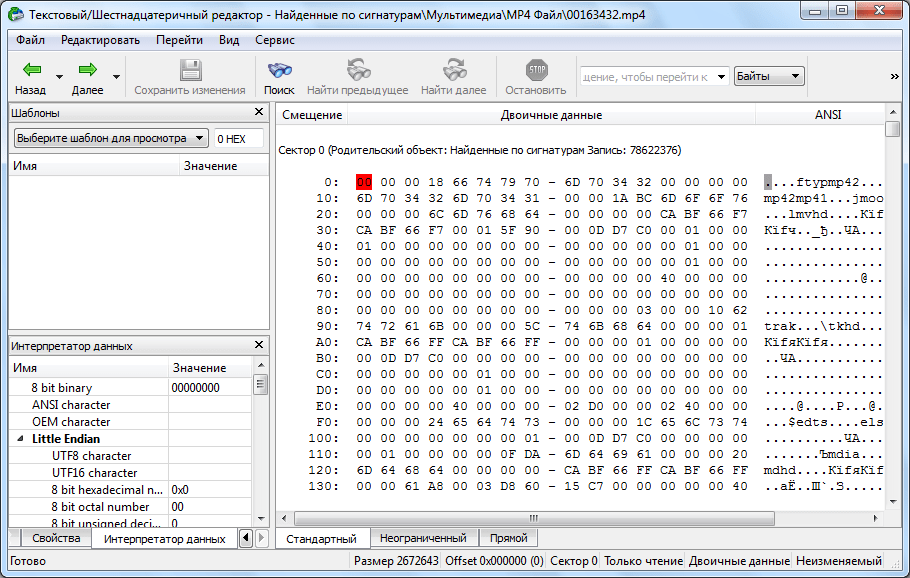
The fact that the R-Studio program is not just an application for data recovery, but a multifunctional processor for working with disks, is evidenced by the fact that it has a tool for editing disk information, which is a hexadecimal editor. With it you can edit the properties of NTFS files.
To do this, left-click on the file you want to edit and select “Viewer-Editor” in the context menu. Or, you can simply type the key combination Ctrl+E.

After this, the editor opens. But, it should be noted that only professionals and very well-trained users can work in it. An ordinary user can cause serious damage to a file by using this tool inappropriately.
Creating a disk image
In addition, the R-Studio program allows you to create images of the entire physical disk, its partitions and individual directories. This procedure can be used both as a backup and for subsequent manipulations with disk content, without the risk of losing information.
To initiate this process, left-click on the object we need (physical disk, disk partition or folder), and in the context menu that appears, go to the “Create image” item.

After this, a window opens where the user can configure the image creation settings for himself, in particular, specify the directory for placing the created image. It is best if it is removable media. You can also leave the default values. To directly start the image creation process, click on the “Yes” button.

After this, the image creation procedure begins.
As you can see, R-Studio is not just an ordinary file recovery application. Its functionality has many other features. We focused on a detailed algorithm for performing some of the actions available in the program in this review. These instructions for working in R-Studio will undoubtedly be useful for both absolute beginners and users with some experience.