How to increase the volume of a partition. How to increase the size of drive C at the expense of drive D without losing data
Hello admin, I want to increase disk space (C:) at the expense of disk (D:) without losing data, but I can’t do anything. Here, look at the "Disk Management" of my computer for yourself. Drive (C:) is 111 GB and drive (D:) is 350 GB and I want to detach 50 GB from drive (D:) and attach them to drive (C:) to increase its space to 160 GB.
First I want to “pinch off” 50 GB from the disk (D:) and attach them to the disk (C:), I click on the disk (D:) and select “Shrink volume”

I set it to 50 GB and click “Compress”

An unallocated area of 50 GB is formed on the disk

I right-click on the drive (C:) and want to select “Extend volume,” but as you can see, the button is blurred.

How can I attach unallocated space to the drive (C:) in my situation?
Friends, you can’t do this using the built-in Disk Management utility in Windows 8.1, so you need a special program from the class of hard disk partition managers.
Therefore, today I suggest you increase the disk (C:) at the expense of the disk (D:) without losing data with the free program AOMEI Partition Assistant Standard Edition 5.6, moreover, it is in Russian and has a very convenient management interface.
We have already written two articles about working in this program:
- AOMEI Partition Assistant Standard- an excellent program for high-quality management of partitions on your hard drive without data loss. Interestingly, the application is free for home and even commercial use! I tested this program for several months and wrote several detailed articles about it for you.
- Friends, I haven’t done anything with this program and I didn’t have any problems, but it still applies to disk partition managers and if you make a mistake somewhere, you can lose your data, so before working with the program, I recommend making a backup of everything partitions of your hard drive. In my opinion, all users should be able to create a Windows backup and deploy it if necessary. Articles to help.

The program is very easy to install without any pitfalls.


After successful installation, launch the program

And in the main window of AOMEI Partition Assistant Standard Edition 5.6, right-click on the drive (D:) and select "Resize partition".
Left click to enlarge image

In the “Moving and resizing partitions” window, click on the delimiter with the left mouse and drag it to the right, thereby freeing up 50 GB of space in front of the volume (C:)


There is 50 GB of unallocated space between drive (C:) and drive (D:). Right-click on the drive (C:) and select "Resize partition"

We grab the delimiter with the left mouse and drag it to the right, thereby attaching the unallocated space of 50 GB to the volume (C:)

and click OK

The AOMEI Partition Assistant Standard Edition 5.6 program works in deferred operation mode and to implement our changes you need to click the "Apply" button

Question from a user
Hello. Not long ago I ran out of space on my Windows disk - and the error “Insufficient space on the system partition of the disk, this may be the reason” began to appear in the tray next to the clock. The fact is that the C:\ drive actually has little space - only 30 GB, but the other D:\ drive has 420 GB (about 200 GB free). Is it possible to increase the size of drive C at the expense of drive D without losing data?
PS Laptop Acer Aspire 5550, Windows 8 system, 500 GB hard drive (Seagate, if I'm not confused).
Hello.
Most often, you have to change the disk size when, when installing Windows OS, you incorrectly calculated the required size of the system disk (also when buying a PC - often the disk is not very conveniently divided: either there is only one partition with Windows, or the size of the system partition is very small).
In general, a similar operation to resize partitions can be done even without installing additional programs if you have Windows 7, 8, 10 installed (if XP, use the link to special software for formatting and partitioning hard drives, link below).
I’ll show you with a specific example where and how to press ☺.
Programs for working with hard drives (partitioning, formatting, defragmentation, etc.) -
Increasing the capacity of the C:\ drive
(Relevant for Windows 7,8, 10. Without loss of data and additional programs)
Important: To increase the size of the C:\ drive - you must have free space
on some other partition of the disk (part of which we will take)
♣
1) Disk management
Modern Windows operating systems have a built-in utility program for formatting and partitioning disks. It's called - disk management . Of course, the first thing you need to do is open it.
To do this, press the button combination Win+R.


Then the required utility should start...

Disk management
♣
2) Separate part of the free space
Now we need to select a disk partition that has free space and “take away” it to subsequently attach the taken space to the “C:\” drive.
To do this, right-click on the selected partition and select the option (in my example below, I decided to shrink volume H:).


Now you need to specify how much free space you want to take on the disk. In my example below, I took the figure to be 5000 MB (i.e. 5 GB).

After the partition is compressed, you should see unallocated disk space appear (a rectangle with a black stripe on top, see screenshot below). This is the place that can now be attached to another disk partition.

Unallocated area
♣
3) Attach unallocated space to the “C:\” drive
We right-click on the drive to which we want to attach unallocated disk space (in the current example, we attach it to the “C:\” drive), and select the option from the menu "Expand volume" .
Note! If the “Extend volume” option is not active and is grayed out (you cannot click it), read a couple of suggested solutions at the bottom of the article.


Basically, the last step is to agree to the operation by clicking on the “Done” button.

All! Your system disk is now 5000 MB larger. This is Good!
♣
4) What if the expand volume tab on the “C:\” drive is not active?
In some cases, when trying to expand a volume, this option in disk management may not be active (it is simply grayed out and cannot be clicked, example below).

There are two solutions:
- Try removing unnecessary partitions used for recovery. As a rule, this is observed more often on laptops where there are special sections from the manufacturer. In my example below, I'll show you how to remove them so that the Extend Volume feature becomes active. Important! In this case, you will disable the ability to restore on your laptop (however, this function is not all that effective and reliable, and rarely helps, but still...).
- Another option is to use special. programs for resizing HDD partitions from this article:
So, let me consider the first case...
You must first run the command prompt as an administrator: to do this, open the task manager (key combination Ctrl+Shift+Esc), then click File/new task , enter CMD and press Enter (example below).

- enter the command and press Enter ;
- next command list disk(all disks in the system will appear, in the example below there is one disk in the system with the identifier "0");
- select disk 0- indicate which disk you need to select. In your case, perhaps instead of “0” you need to indicate the disk identifier that you need (screen with an example below).
Next steps:
- - look at all the partitions that are on this disk;
- select partition 6- select a specific partition on the disk. Please note that instead of “6” you need to indicate your number (make sure that the message “Section X is selected” appears).

List partition (in my case, it was necessary to delete partitions 6 and 8 (used for recovery) in order for the "Extend volume" tab to become active).
And the last command to delete the selected partition is delete partition override. Important! Be careful, this command will delete the selected section, all information from it will be lost!

To delete the next partition, you need to select it again (for example, select partition 8 and then use the command again to remove delete partition overrid ).
Actually, that's all - the problem is solved.
Editing partitions and volumes helps out in case of thoughtless disk partitioning at the beginning of Windows installation. Any shortcomings made during installation can be easily corrected.
Why do you need to change hard drive partitions?
Due to the large number of programs and games occupying almost all the free space, Windows begins to slow down, and defragmentation of partition C is carried out with errors.
The main reason for changing hard disk partitions is the lack of space on the system partition C.
At this time, up to several hundred gigabytes are empty on partition D, but moving some files to partition D forces you to reconfigure many third-party applications. In this case, it is easier to expand drive C at the expense of D.
How to expand C drive
Expanding drive C is possible using both Windows tools and third-party programs.
Extending the C drive directly in Windows 7
If you want to expand the disk using standard Windows tools, do the following:
- By pressing the Win + R buttons, bring up the “Run” window. Enter the command "diskmgmt.msc" and click "OK". The command “diskmgmt.msc” will open the Disk Management utility
- Select partition D and in the volume context menu click on “Delete Volume”. Do not rush to edit hidden drives without a volume name, since deleting a partition will destroy all valuable files stored on it. The necessary information should be copied in advance to another disk or removable media. You cannot remove drive C, on which the system itself is installed. After disk D is destroyed, there will be unallocated space in its place.
 Select the volume and delete it
 - Select drive C and in the context menu give the command “Extend volume”.
- Set the number of megabytes that will be added to drive C. It will not be possible to exceed the maximum value, since the physical media itself is limited. Click Next.
 The size of the resulting previously unlabeled area will decrease by this amount.
 - Drive C will be enlarged. The size of drive D will be reduced by the megabytes given to drive C. Click on a free area of the drive and give the command “Create a simple volume”. When recreating volume D, this partition will be automatically formatted (quick formatting using Windows tools is applied).
 Click on the remaining unallocated area and click on “Create Simple Volume” in the context menu
There is now enough space in C for Windows and your programs to run normally.
If you wish, you can use third-party applications, for example, Acronis Disk Director or Partition Manager. But it should be remembered that in the hands of inexperienced users, alternative programs often become not a “magic wand”, but a means of destroying the user’s files, and only a computer service center will be able to restore your lost data.
Video: Extending a volume using Windows 7 tools
Expanding the C drive when reinstalling Windows 7
When installing Windows, you will not skip the stage of changing disk partitions. During the reinstallation process, the program will ask which partition to install the system in and will suggest redistributing the hard drive space.
There are two types of Windows installations: upgrade and full installation. The update is carried out on top of the existing system, preserves all installed programs, but resets system parameters. Full installation - installation with formatting of the system partition, or installation on another partition of the hard drive. If you want to change hard disk partitions, then you need to choose the second installation type.
If you really need a “clean” installation of Windows, do the following:
- Insert the installation DVD or USB flash drive and restart your PC.
- To open the BIOS window, press the Del, F2, or Esc key during system startup (the choice of key depends on the computer manufacturer). In the window that opens, use the arrows to select “Boot”.
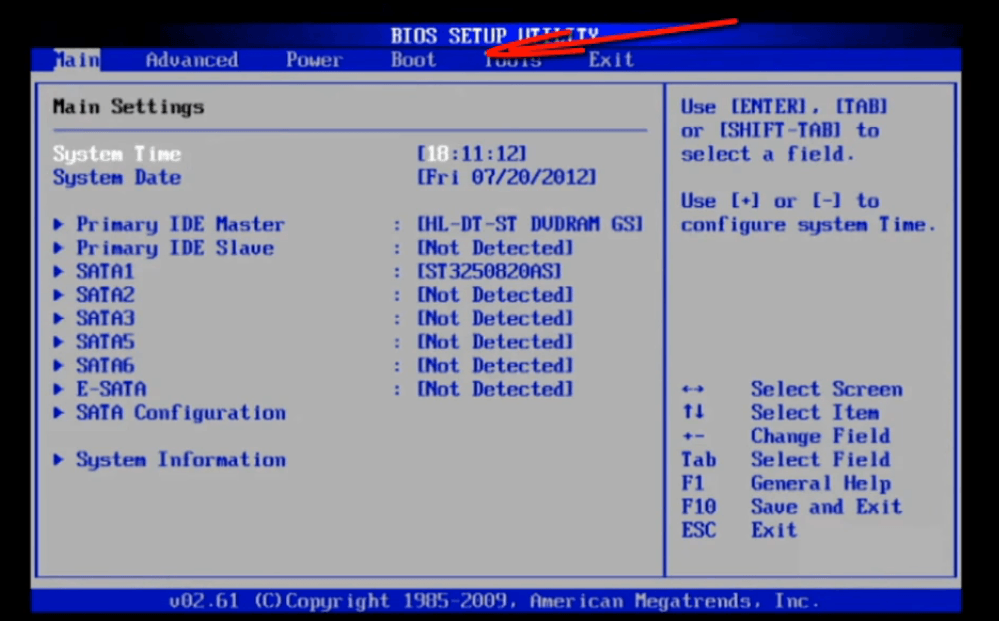 In the window that opens, use the arrows to select “Boot”
 - Next, use the arrows to open the “Boot Device Priority” tab and in the list, select the boot device from which you need to boot the system. Close the BIOS and save the changes.
 In the list, select the boot device from which you need to boot the system
 - Wait for the installation program to load into the PC's RAM.
- Select the type of Windows reinstallation.
 Select full Windows 7 installation
 - For example, one disk and one partition are taken. Select the drive and click Disk Setup. All your files should be copied to other drives in advance.
 Select the drive and click "Disk Setup"
 - Additional links will appear - click the “Delete” link. A warning about data transfer will appear, click “OK” and delete the partition. Do the same with adjacent sections (D, E, etc.), if there are any.
 Click "OK" if your personal files have been copied to other media
 - After removing existing partitions, you will have an unallocated (unformatted) disk area, which is the full size of the hard drive. To create new sections, click the “Create” link.
 Windows 7 Setup will help you create new logical drives
 - Specify the size of partition C, and create partition D in the same way. Go to partition C and format it. A quick format will be applied (clearing the disk table of contents).
 The installer requires you to format partition C
After formatting, Windows will continue to be reinstalled. Section C has been successfully modified.
Video: resizing partitions during reinstallation of Windows 7
Why can't I expand a volume in Windows 7?
A situation where the “Extend volume” option is inactive is possible. For example, we take the extension of the same C drive.
 A situation where the “Extend volume” option is inactive is possible
 - a spanned volume was created as D, which includes, for example, drives D and E. Transfer files from these partitions to other media. Remove this spanned volume;
- you forgot to delete all subsequent volumes, including drive D. Expanding the previous volume only works when deleting the next one.
How to delete a volume
You can only add an unallocated partition to a disk, which appears after deleting a volume.
Deleting a volume in Windows 7
To delete a volume:

You will be left with free space the size of this volume, which can now be attached to another partition.
Why can't I delete a partition or volume?
In some cases, removal may be difficult.
The reasons are as follows:

How to remove the swap file
To make volume deletion available, do the following to eliminate the Windows page file:
- From the Start menu, go to Control Panel.
 From the Start menu, go to Control Panel
 - Go to the “System” section.
 Go to the "System" section
 - Go to "Advanced system settings".
 Click on "Advanced system settings"
 - In the "System Properties" window, go to the "Advanced" tab and click on the "Options" button in the performance settings.
 Click this button
 - In the performance settings window, select the “Advanced” section and click on “Change”.
 Select the “Advanced” section and click on “Change”
 - In the virtual memory settings window, uncheck the option to automatically select the paging file size and check the box next to “Without paging file”. Click on the “Set” button.
 Uncheck the option to automatically select the paging file size and check the box next to “No paging file”
 - Click "Yes" when prompted to clear the page file.
 Answer yes to the request to clear the page file
 - Close all windows by clicking "OK" and restart your computer.
Go back to Disk Management and try to delete the volume again. Check to see if this volume is connected to a neighboring volume on the same partition.
How to shrink a volume
The disk can also be expanded by compressing it. As a result of compression, free space will be obtained, which can be used to create a new partition or volume.
Features of volume compression in Windows 7 are as follows:
- compression works only for primary and secondary partitions, as well as in the NTFS file system. If the partition or volume is formatted in FAT32, move the data from it and reformat (or convert) it to NTFS. To do this, call the disk context menu and click “Format”;
- if a partition or volume has many bad sectors, it will not be possible to shrink it;
- The page file, hibernation files, and recovery point data present an additional challenge to compacting partitions and volumes. Compression will not proceed beyond the second area of free space, counting from the beginning of the volume.
Shrinking a volume using Disk Management
If you want to shrink a volume using standard Windows tools, then:

Shrinking a volume using the command line
If the volume shrink option in Disk Management is no longer available, use the Windows Command Prompt. It can bypass the inactivity of some actions that are hidden by the Windows graphical shell. The instructions are universal for Windows 7/8.x/10.
- Search for the Command Prompt application in Start and run it with administrator rights. Tasks beyond the use of application programs often require administrator privileges in Windows.
 Launch the Command Prompt application with administrator rights This command displays a list of disks, partitions and volumes. The command line reports the maximum available volume space for compression
 - Enter "shrink desired=(number in megabytes)" which you want to shrink. The “shrink” command is entered with parameters, and if they are missing, all available content will be compressed.
 The “desired” attribute is a variable that corresponds to a value in megabytes
When volume compression is complete, the command line will display a message indicating that the volume was successfully reduced by the specified megabytes. Using the Disk Management application, make sure that there is free space in which you can create a new volume.
Video: Shrinking a volume using the command line
Expanding, compressing, deleting, adding new partitions and volumes using a standard Windows utility is not difficult. The main thing is not to lose valuable data that you have been collecting and creating for many years.
Almost every owner of a computer with Windows 7 eventually faces a shortage of disk space on the system drive “C”. Usually, when the simple method of uninstalling unnecessary things and moving information to a logical volume no longer helps, the user thinks about how to expand the system drive C on the Windows 7 operating system.
Below are step-by-step guides on how to enlarge the “C” drive and still preserve the important files stored on the hard drive. The instructions will help expand the volume for users who are already constantly experiencing low memory alerts and problems with the operating system suddenly slowing down in Windows 7.
Typically, partition “C” is full due to a significant number of applications installed on the computer. But sometimes for beginners it is full due to the storage and constant saving of various files on it, including music, videos and images.
Also, a large amount of space is occupied by temporary system files and the Internet, which sometimes makes it impossible to open some utilities. Users who mistakenly allocated little space for the system partition during the installation of Windows 7 on their computer are also faced with the task of expanding volume “C”.
Methods for increasing "C"
You can effectively solve the problem by using:
- Special applications;
- Built-in Windows 7 disk management tools.
These methods are based on expanding the space of the system partition by using a logical volume, for example, named “D”, “E”, etc. The main condition is that the volumes must be located on the same hard drive.
It should be noted that computer owners who decide to use the second method, that is, use the built-in tools of Windows 7, will have to take care in advance of the safety of important files stored on the logical partition and it is strongly recommended that before using the method, save them on an external hard drive or in the memory of another computer .
Using the "Aomei Partition Assistant" application
This utility is distributed freely on the global network and does not contain unnecessary software. The application interface is intuitive and completely Russified. The application functions perfectly in the Windows 7 OS environment. The choice of language is carried out during the installation procedure of the program.
The following sequential steps must be performed:
Using the MiniTool Partition Wizard Free program
Like the previous utility, it is freely available on the World Wide Web and does not contain additional (imposed) software. It is also very easy to use, but there is no Russian-language interface.
 Externally, the main menu of the application is similar to “Aomei Partition Assistant” and the algorithm of actions in it is also similar.
The following steps are required:

Via built-in Windows 7 tools
You should take care in advance about the safety of important files stored on a logical partition and it is strongly recommended that before using this technique you save them on an external hard drive or in the memory of another computer.
Each time there is less and less free space on drive C. The problem of memory exhaustion is common to all computers, even those with a HDD or SSD with a large amount of free space. At the same time, Windows cannot work normally when there is a shortage of memory, so it is imperative to ensure sufficient space for the system. There are two ways to achieve this goal: remove existing files or increase the disk size. At the moment, I am more interested in the second direction - increasing disk space.
The problem appears due to one feature of Windows - a gradual increase in the size of the system and the constant addition of temporary files. Over time, system files, as well as temporary files, tend to take up more space. All versions of Windows suffer from this, without exception.
Initially, the lack of space can be corrected by deleting useless programs, temporary files, downloads, etc. All the same, the inevitable situation is when only important applications are left on the disk, and, alas, there is not enough space. Some users give up, but this is not worth doing, since the system begins to process requests very slowly, programs often crash, and errors become the norm.
To continue to use local applications normally, you need to provide enough free space on drive C. So, how to increase the capacity of the C drive? We'll tell you in our article.
How to clean a disk from garbage?
The easiest way to free up space is to remove all junk. If the problem of lack of space has appeared recently, it is still possible to get by only by deleting useless data. For some time this will be enough for normal operation of the system. You need to clean out the garbage in several stages.
Algorithm of actions is given below.
- We clean temporary files (they inevitably accumulate when all applications are running). The CCleaner program copes with the task efficiently and quickly. Just download the utility from the link, on the first tab click on the “Analysis” button, and then click on “Cleaning”.
- Removing useless files. By default, Windows browsers download all files to the “Downloads” section located on drive C. There may be a lot of unnecessary stuff here: software distributions for installation, outdated files, torrents, etc. It’s worth checking the sections where files are downloaded and deleting them everything is useless.
- Uninstalling programs. Many users go through 2, 5 or 10 applications in search of suitable ones. Having found a good utility, the search stops, but previously installed programs remain in the system. They should be removed by going to the “Programs and Features” section, menu - “Control Panel”.
- Transfer media files to another drive. It is better to store photos, movies, music, games, etc. on drive D. Such files should be cut from drive C and moved to D.
How to increase the size of drive C at the expense of drive D?
Add free space to a logical drive Using standard Windows tools or through applications. The main disadvantage of the first method is the forced formatting of the partition. The programs cope with the same task, but without deleting files, so this option is a priority.
Using Aomei Partition Assistant
A free utility with a good reputation successfully copes with transferring space and saving data.
Its advantages include:
- easy setup;
- the ability to launch several actions at once;
- reliable operation;
- Russian interface.
The entire procedure is absolutely safe for your computer and hard drive.
Main functions of the program:
- creating and deleting logical drives;
- transferring free space between disks;
- formatting;
- merging, splitting, copying sections.
Of greatest interest to us is the transfer of free space.
To perform it, you should use the instructions:
- download the application from website;
- install and run the program;
- right-click on the disk where there is free space intended for transfer and click on “Resize partition”;
- Reduce space on drive D to create unallocated space.
Important! The slider should be moved from left to right, the freed volume should appear before the other data on the disk.
- repeat step 3, but for drive C, and expand its space using the space on the right;
- In the main window, click on the “Apply” button.
Healthy! The program supports deferred action, which means that no changes occur until you click “Apply”. Before starting the procedure, all changes can be corrected.
Using MiniTool Partition Wizard Free
This is another similar program that is not inferior to the previous one. Has the ability to move space without formatting disks. The only drawback is the English-language interface, but it is intuitive, so it’s quite difficult to get confused.
The method for adding free space to drive C is no different from the previous program. The instructions from the last section also apply to the MiniTool Partition Wizard. Using control points, you first need to reduce one disk, and then increase the other. If you need to allocate precise space, you can specify the desired volume in numbers (indicated in megabytes).
All of the above methods create free space on the C drive, so the reader can independently choose the method he likes. Typically, after the procedure, the system begins to work much faster and failures occur less frequently.